
5 0 0:SEP Si3 Replication
Overview
| Visit SEP sesam YouTube Channel for latest videos and webinars. |
| Check FAQ to find the answers to most common questions. |
| Problems? See the Troubleshooting Guide. |
| If you are using an older SEP sesam version, refer to Documentation archive. |
SEP Si3 replication is designed to consistently replicate data between SEP sesam Remote Device Servers (RDS), which can also be SEP sesam Servers. This is advantageous in terms of redundancy for disaster recovery and providing an additional source for ordinary data restore.
SEP Si3 replication is used together with Si3 target deduplication, an inline block-level data deduplication solution that writes data directly from the SEP sesam Server or Remote Device Server (RDS) to the backup media. Storing only one instance of the data on the backup media results in a reduced amount of data backed up on storage.
Combined with SEP Si3 replication, it provides faster backup cycles and better SEP sesam performance.
- SEP Si3 target deduplication can be easily configured by creating the Si3 deduplication data store type. As of SEP sesam v. 5.0.0 Jaglion, two Si3 deduplication store types are available. It is strongly recommended to use the newer type SEP Si3 NG deduplication store as the old generation Si3 deduplication store is deprecated.
- Use the new Si3 NG deduplication store if the data is to be stored to S3 Cloud. If you are using an old generation Si3 deduplication store with S3, you cannot restore from S3 using the GUI! See Enable Si3 NG setup on the same host to learn how to configure a new Si3 NG and an old Si3 on the same backup server or RDS to make the upgrade from Si3 to Si3 NG smoother.
SEP sesam provides different types of replication: basic Si3 replication, replication based on HPE Catalyst store and HPE Cloud Bank Storage, and in earlier versions, using the old-generation Si3 store, replication to S3 Cloud storage. Instead of using the old way of replication to S3 Cloud, SEP recommends using the new generation Si3 NG store, which allows you to back up your data directly to S3 Cloud (replication to S3 Cloud is not supported with Si3 NG).
For more details on these types, initial replication
and scheduling, see About Replication.
Prerequisites
To ensure error-free operation of SEP sesam and improve performance, make sure that the following conditions are met:
- SEP sesam replicates data between a SEP sesam Server and an RDS or between two RDSs. Therefore, on a SEP sesam Server either two RDSs or one RDS must be configured in addition to the SEP sesam Server. For details on installing RDS, see How to configure Remote Device Server.
- Both, SEP sesam Server and/or RDS (or more of them) must have the same SEP sesam version installed. You can configure more than one RDS, but their SEP sesam version must match the SEP sesam Server version. Check the hardware requirements for SEP sesam Server.
- Java must be installed on the RDS and on the deduplication clients. For details on the required Java version, see Java Compatibility Matrix.
- A valid Si3R replication license is required for each Si3T node (SEP sesam Server or Remote Device Server). For details, see Licensing.
- The same amount of disk space is required for source and target data stores. Ensure that there is enough disk space available for both data stores, bearing in mind that horizontal scaling may be required.
- You have to ensure a sufficient amount of memory and CPU, reliable network connection and bandwidth, etc., as described in Replication Best Practices.
Configuring SEP Si3 replication
Note that the following instructions are the same for both types of deduplication store. Si3 NG is therefore not explicitly mentioned, but the term Si3 store is used for both types of deduplication store.
To configure SEP Si3 replication, proceed as follows.
- Configure your Si3 deduplication store as described in Configuring Si3 NG Deduplication Store. Before you begin, check the system requirements and recommendations. Again, make sure you have enough disk space and that your storage can be extended for the needs of deduplication.
- Configure the media pool(s) for your Si3 deduplication store. As the retention time is set at the media pool level, create the media pools accordingly, for example, source_dedup_daily (proposed retention time: 7 days), source_dedup_weekly (proposed retention time: 30 days), source_dedup_monthly (proposed retention time: 200 days) media pool. For details, see Configuring media pools for data stores.
- Add one or more RDS as ordinary SEP sesam Clients: In the Main selection -> Components -> Clients, click New Client. Make sure you correctly specify the short name or FQDN of the client in the Interfaces field (in the New Client dialog) to establish a DNS connection between SEP sesam Server and SEP sesam RDS. For details, see List of Ports Used by SEP sesam and How to check the DNS configuration.
- Now configure a remote Si3 NG deduplication store on each SEP sesam RDS, based on the same system requirements and recommendations.
- Configure the media pools for your remote Si3 deduplication store.
- Test both Si3 deduplication stores by executing a backup on each of them.
- Create a new backup task: In the Main Selection -> Tasks -> By clients, select your RDS client and then click New Backup Task. Configure your backup task and save it. For details, see Creating a Backup Task.
- Test the backup on the source Si3 deduplication store: From the menu bar, select Activities -> Immediate start -> Backup. In the Immediate start: Backup dialog, select the source_dedup media pool as the target media pool for the backup. Click Start and check whether your backup performed successfully.
- Test the backup on the target Si3 deduplication store: In the menu bar, select Activities -> Immediate start -> Backup. In the Immediate start: Backup dialog, select a target_dedup media pool as the target media pool for your backup. Click Start and check if your backup performed successfully.
- Create a replication task: In the Main selection -> Tasks -> Replication Tasks, click New Replication Task. The New Replication Task window is displayed.
- In the Name field, enter a meaningful name for the replication task, e.g., rep-source_mediapool-to-target_mediapool.
- Under the Parameters, specify the following:
- Media pool
- Pool: Enter the name of the source media pool from which the data will be replicated, e.g., source_mediapool.
- Drive: Select the drive number of the drive that will be used to read the data.
- Interface: Optionally, specify the network interface of the RDS to be used for data transfer, e.g., the name of the RDS.
- Destination
- Pool: Enter the name of the target media pool to which the data will be replicated, e.g., target_mediapool.
- Drive: Select the drive number of the drive that will be used to write the data.
- Interface: Optionally, specify the network interface of the RDS to be used for data transfer, e.g., the name of the RDS.
- To set the time frame for the backups to be replicated, select Relative backup date (recommended) and select the appropriate values for the From/To fields. These fields specify the number of days in the past that are considered for replication, meaning all data in the source media pool that was backed up within a given period of time will be considered for replication to the remote pool.
- For example, to replicate all data from the last week, the Relative backup date (From) is set to -7 and To is set to 0.
- Because the replication will always replicate only new blocks of data, you can specify a very high number in the from field, such as -99.999. In this way, all backups since the initial replication are always checked, but only the changed data is replicated.
- You can also set the the Relative backup date (From) to -1 to replicate only data from the previous day.
- In the drop-down list based on, the Sesam days option is selected by default. The Sesam day is a backup day that you define according to your backup routines. For example, your backups can run after midnight but retain the previous day's backup date. The Sesam day/backup day is defined by the time set in the NEWDAY event. For details, see SEPuler: SEP sesam backup day.
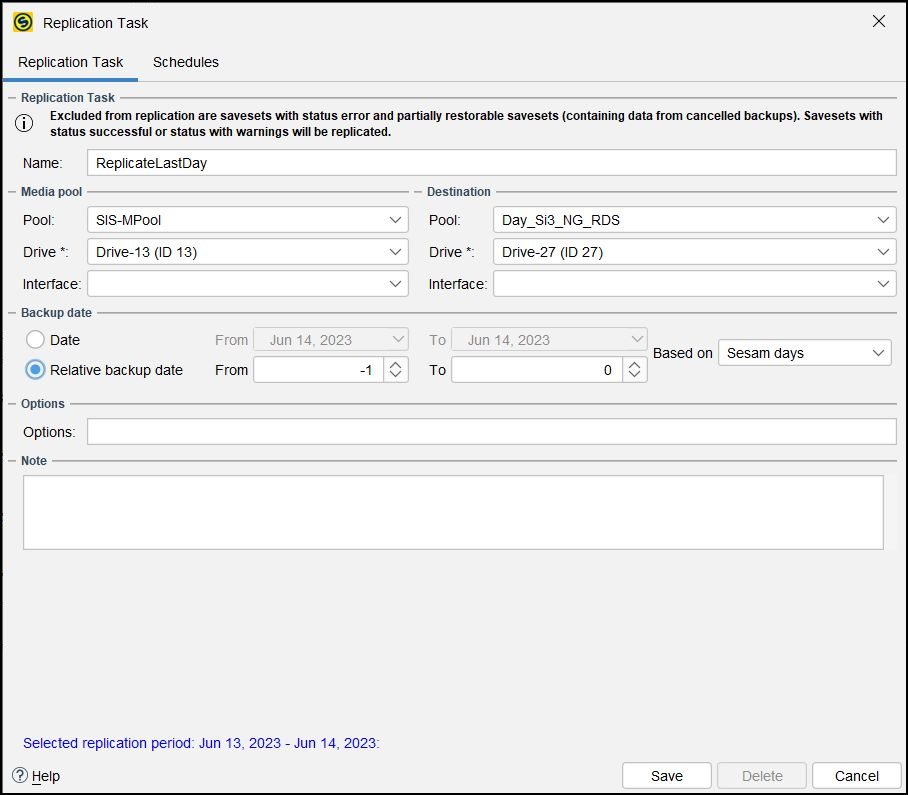

Note You cannot replicate savesets with errors. It is possible to replicate savesets with status successful, savesets with warnings (status successful or with warnings) or partially restorable savesets (with data from cancelled backups). - Click Save to save your replication task.
After you have configured a replication task, run the initial replication and then schedule the replication as described in the following sections.
Initial replication
- When data is transferred for the first time, all data is replicated from the source to the destination server. Therefore, the initial replication requires a larger amount of CPU, network bandwidth and time to complete successfully.
- You should start the first replication manually. After the initial replication is completed, all subsequent replications will only transfer the data that has changed on the source server.
- All subsequent replication cycles should be scheduled to start automatically (see the following section Scheduling replication).
To start replication manually, proceed as follows:
- In the GUI menu, select Activities -> Immediate start -> Replication (previously Migration).
- In the Immediate Start: Replication window, from the Task name drop-down list select the replication task you want to start and click Start.

To ensure that the replication is successful, check its status as described in Checking replication status below.
Scheduling replication
You can add your replication task to one or more schedules to automate your replication.
- From Main Selection -> Scheduling -> Schedules, click New Schedule. The New Schedule window appears.
- Configure your schedule and click OK. For details, see Creating a schedule.
- Right-click the schedule you have just created and select New Replication Event. The New Replication Event window opens.
- From the Task name drop-down list, select the task you want to link to the schedule. Optionally, under Sequence control, set up the Priority of your replication event. SEPuler always executes the schedules with higher priority first. Default priority level is 1, which is the lowest priority (the highest is 99). The only exception are the schedules with priority 0, which override all other priorities and are always executed. For details, see Setting Event Priorities. You can also enable the Blocking date, see Special Schedules. Click OK to link the event to the schedule.


See also
About Replication – Replication Best Practices – Configuring Si3 NG Deduplication Store – S3 Cloud Replication – HPE StoreOnce Replication